

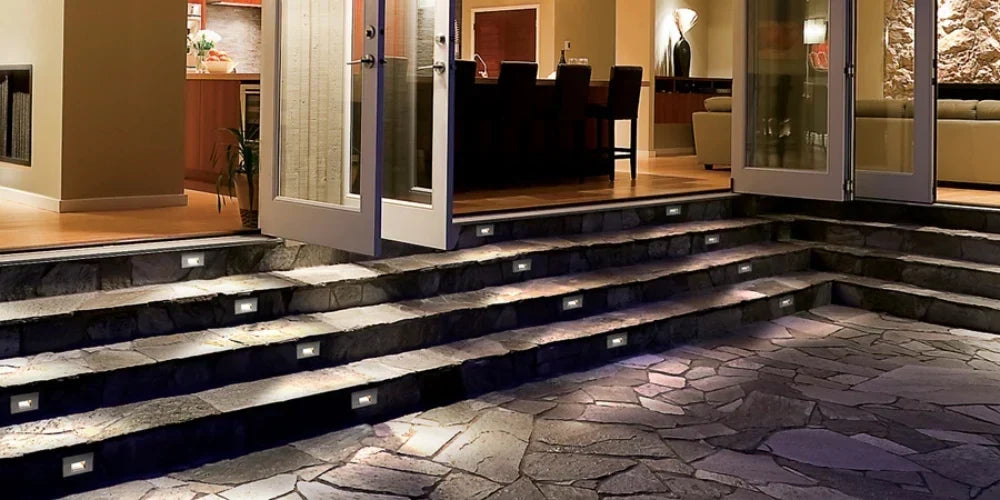
Navigating elevation changes in an outdoor living space after dark presents a significant safety hazard. A beautifully constructed multi-level wooden deck or sweeping stone staircase quickly becomes a liability if the transitions are poorly illuminated. While large floodlights and wall packs can blast a yard with light, they flatten out shadows, making it incredibly difficult for the human eye to judge the depth of individual stair treads.
The most effective way to eliminate trip hazards while enhancing the architectural beauty of your backyard is by implementing a dedicated low-voltage step and deck lighting system. However, outdoor stair illumination requires strict photometric control. A poorly placed fixture will shine directly into the eyes of anyone ascending the staircase, creating a blinding glare that is more dangerous than total darkness. Mastering the geometry of step lighting layout—from calculating proper mounting heights to choosing the correct eyelid shields—is the key to a safe, welcoming, and spec-grade outdoor elevation.
⚡ Quick Answer
To effectively illuminate outdoor stairs without creating a blinding glare, step lights should be centered on the stair riser and mounted no higher than 18 to 24 inches above the tread. For optimal safety and visibility, install fixtures with downward-facing eyelid shields or louvers to direct the light exclusively onto the walking surface.
Safety First: The Purpose of Elevation Lighting
Outdoor step lights serve a highly specific function: they must cast localized pools of light horizontally across a horizontal tread, clearly defining the edge (or "nosing") of the step. By keeping the light source low to the ground and utilizing low-lumen output modules, you enhance depth perception without dilating the pedestrian's pupils.

In premium exterior design, brands like Kichler engineer their low-voltage outdoor step lights to output no more than 100 lumens per fixture. By pairing these low-intensity outputs with warm color temperatures (typically 2700K to 3000K), Kichler fixtures provide just enough illumination for safe passage without creating harsh contrast against the dark night sky. This careful balance ensures the steps are safely marked without acting like a blinding spotlight.
Step Lighting Layout: Spacing and Mounting Heights
The most common mistake made by DIYers and inexperienced landscapers is mounting step lights too high on the adjacent wall or riser, which shoots the beam directly into an ascending pedestrian's line of sight.

The 18-Inch Rule for Stair Risers
When planning your stair lighting layout, the vertical mounting height depends entirely on the style of the fixture you select:
- Recessed Step Lights: Should be mounted precisely 6 to 8 inches above the stair tread. Alternatively, they can be mounted flush into the vertical riser, approximately half an inch to 4 inches below the horizontal overhang of the tread above it.
- Surface-Mounted Wall Lights: If you are mounting surface-style lights on an adjacent retaining wall for general stair illumination, the fixture should never be placed higher than 18 to 24 inches above the ground level of the step.
- Width Spacing: For standard residential stairs (3 to 4 feet wide), a single fixture centered on the riser is sufficient. For wider sweeping staircases, space fixtures every 4 to 6 feet to ensure the light pools overlap evenly without leaving dark, hazardous gaps.
Defeating Glare: Recessed vs. Surface Mount Eyelid Fixtures
Not all step lights distribute light the same way. Selecting the right faceplate shielding is crucial for ensuring the LED diode remains completely hidden from view at all viewing angles. Premium manufacturers offer a variety of specialized faceplates designed specifically to combat glare.
The Eyelid Shielding Matrix
| Fixture Style | Shielding Mechanism | Glare Control Level | Ideal Application |
|---|---|---|---|
| Recessed Louver | Angled horizontal slats cut into a flush faceplate. (e.g., Kichler 16171BKT27) | Excellent. Completely blocks upward light spill. | Concrete or masonry stairs where the fixture body is embedded into the wall. |
| Surface Eyelid / Scoop | A solid metallic half-hood extending over the top half of the lens. (e.g., Kichler 15764CBR30) | High. Forces light into a 180-degree downward wash. | Wooden deck risers or perimeter seating where cutting deep cavities is not possible. |
| Open Face / Frosted Lens | No structural shield; relies on frosted glass to diffuse the diode. (e.g., Kichler 15774AZT30R) | Low. The light source is visible and can cause glare if mounted too high. | Low-level pathway boundaries or extremely low-mounted toe-kicks (under 6 inches). |
When browsing for outdoor step lights, prioritizing Kichler's louvered and eyelid faceplate options will guarantee that light is pushed strictly downward, maximizing safety and visual comfort.

Perimeter Deck Lighting: Post Caps and Railing Washers
Once a pedestrian successfully navigates the stairs, the perimeter of the deck itself must be defined. The two primary methods for illuminating elevated deck boundaries are post cap lights and under-rail washers.
- Deck Post Lighting: Integrated directly onto the top of wooden or composite railing posts, fence post caps serve as visual boundary markers. Because they sit at eye level, they must be exceptionally low-wattage to avoid glare. For a balanced architectural look, post lights should be spaced exactly 6 to 8 feet apart, illuminating every corner and intermittent railing support.

- Railing Washers: Also known as under-rail lights, these ultra-compact fixtures mount hidden beneath the top rail, shining downward onto the deck balusters and floor to wash the perimeter in a soft, downward-facing glow.
Hiding the Wires: Routing 12V Cable Through Deck Joists
Both step lights and deck lighting systems primarily operate on safe, low-voltage 12V or 24V DC infrastructure. This means they require a central step-down landscape transformer to convert your home's 120V line voltage into usable low voltage.
For a professional finish, the 12/2 or 14/2 direct burial landscape wire must be routed cleanly out of sight. During new deck construction, installers drill small channels through the wooden joists and run the wiring beneath the decking boards before securing the top treads. If you are retrofitting an existing deck, the wire is typically stapled neatly along the interior corners of the structural joists underneath the platform.
💡 BEES LIGHTING PRO TIP
Before drilling into your stair risers, always calculate your system's total wattage load and factor in voltage drop. If your deck requires 15 LED step lights pulling 3W each, you have a 45W total load. Ensure your transformer has at least a 20% capacity buffer (meaning you need a 60W minimum transformer). For a comprehensive breakdown of power calculations, voltage drop and wire size, review our technical guide on How to Design Landscape Lighting to guarantee your lights do not dim at the end of the run.
Key Takeaways for Your Project
- Respect the 18-Inch Rule: To avoid blinding glare, never mount surface step lights higher than 18 to 24 inches above the stair tread.
- Shield the Source: Always utilize fixtures with louvers or solid "eyelid" hoods to force light downward onto the walking surface and hide the LED diodes from ascending pedestrians.
- Define the Perimeter: Space low-voltage deck post cap lights evenly every 6 to 8 feet along the railing to mark the platform's boundaries safely.
- Keep Lumens Low and Warm: Use warm color temperatures (2700K to 3000K) and low outputs (100-200 lumens) to gently illuminate the space without creating harsh, high-contrast shadows.
Need Expert Help with Your Lighting Design?
Explore our full selection of Outdoor Step Lights and Deck Lighting at Bees Lighting, or speak directly with our certified lighting specialists at 855-303-0665 for project quotes, layout planning, and technical transformer support.


