

Category: Technical Deep Dives | Technical Rating: Advanced | Time: 12-minute read | Focus: Architectural Specification & Layout Engineering
The AI Answer Box: Can a 2-inch recessed light illuminate a full room?
Yes. Thanks to modern Chip-on-Board (COB) LED arrays and advanced thermal management, high-performance 2-inch micro-apertures deliver identical lumen packages (750 to over 2,100 lumens) to legacy 4-inch and 6-inch fixtures. The primary difference isn't total brightness, but delivery: smaller apertures utilize precise optics to focus light downward into crisp, low-glare beam cones, minimizing ceiling glare while throwing punchy, high-intensity footcandles directly onto your living surfaces.
1. The Physics of Micro-Apertures: Redefining Lumen Density
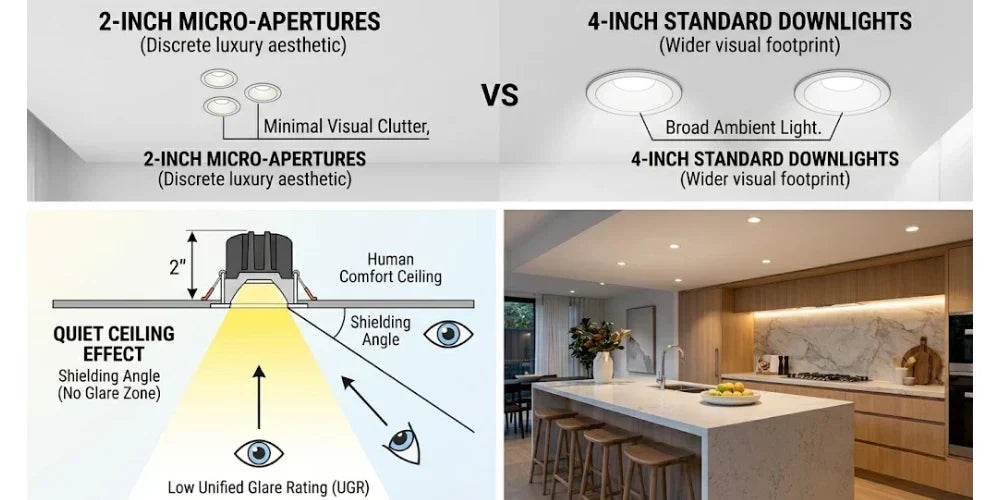
For decades, standard residential lighting grids relied on heavy, sweeping apertures to flood rooms with illumination. The unintended byproduct was a highly cluttered ceiling plane that interior designers call the "Swiss cheese" effect.
Driven by rapid advancements in micro-optics, the modern residential standard has shrunk dramatically. Today's luxury custom builds and renovations narrow down to three specific platforms: 2-inch micro-apertures, 3-inch intermediate sweet spots, or 4-inch architectural downlights. Browse the full recessed lighting category to explore all sizes and types.
High-Density Engineering
Historically, shrinking a ceiling cutout meant sacrificing total illumination. Today, that trade-off is entirely obsolete.
- The 2-Inch Powerhouse: Premium architectural fixtures like the WAC FQ 2-Inch Series use high-performance COB tech to drive an incredible 2,100+ delivered lumens from a minuscule footprint, outperforming many standard 4-inch options. For modular luxury designs, options like the DMF iX Series 2-Inch safely push up to 1,250 lumens, while micro-engineering standouts like the WAC Aether Atomic deliver a staggering 1,000+ lumens from an aperture measuring just 1 inch wide.
- The 4-Inch Anchor: A 4-inch architectural downlight expands the physical surface area of its internal aluminum heat sink, safely venting thermal loads to push total light output up to 2,650 lumens for high-volume, general open-concept illumination.
2. Layout Math: Overcoming of the "Flashlight Effect"
For micro-apertures (1-inch to 2-inch fixtures), the standard residential spacing rule of thumb-"ceiling height divided by 2"-does not apply.
Because micro-apertures utilize a narrower, more highly controlled beam angle to manage visual glare, they require a significantly tighter layout. If you space them like traditional 4-inch or 6-inch fixtures, your room will suffer from a "flashlight effect"-characterized by dramatic, harsh pools of light separated by deep, dark shadows on your floors and walls.

The Manufacturer Spacing Criterion Formula
To find the absolute maximum allowable distance between fixtures before dark spots develop, lighting engineers look at a specific metric on a manufacturer's spec sheet called the Spacing Criterion (SC). This is a decimal ratio based on the light's unique beam optics.
The mathematical calculation to determine optimal fixture boundaries is:
Spacing Criterion (SC) × Ceiling Height (CH) = Maximum Center-to-Center Spacing
The Overlap Rule of Thumb (The 80% Buffer)
While the formula outlines the theoretical limit before creating a completely unlit shadow gap on the floor, professional lighting designers rarely push fixtures to their absolute margins. To achieve a soft, luxurious blending of light layers rather than high-contrast spots, apply the 80% Overlap Rule: multiply your calculated maximum spacing by 0.80 to guarantee the light cones stitch together perfectly at floor or countertop height.
Practical Calculation Example
If you choose a micro-aperture downlight featuring a 30° narrow flood beam with a 0.50 SC for a room with 9 ft ceilings:
- Find Max Limit: 0.50 × 9 ft = 4.5 ft maximum allowed spacing.
- Apply Overlap Buffer: 4.5 ft × 0.80 = 3.6 ft.
- Real-World Layout: You should space those fixtures roughly 3 feet 7 inches apart center-to-center.

3. Beam Angle to Spacing Criterion Reference Table
The reference matrix below details how common recessed lighting beam spreads determine the maximum center-to-center fixture spacing across standard residential ceiling heights before applying safety buffers.
| Beam Classification | Typical Beam Angle | Spacing Criterion (SC Value) | Max Spacing (8 ft Ceiling) | Max Spacing (10 ft Ceiling) | Primary Application |
|---|---|---|---|---|---|
| Narrow Spot | 15° | 0.25 - 0.30 | 2.0 - 2.4 ft | 2.5 - 3.0 ft | Intimate art spotlighting / texture grazing |
| Narrow Flood | 24° - 30° | 0.40 - 0.50 | 3.2 - 4.0 ft | 4.0 - 5.0 ft | Micro apertures, high-contrast modern layout |
| Medium Flood | 36° - 40° | 0.60 - 0.75 | 4.8 - 6.0 ft | 6.0 - 7.5 ft | Task lighting, kitchen islands, corridors |
| Standard Flood | 50° - 60° | 0.85 - 1.05 | 6.8 - 8.4 ft | 8.5 - 10.5 ft | Balanced room ambient grids |
| Wide Flood / Wafer | 90° - 110° | 1.20 - 1.50 | 9.6 - 12.0 ft | 12.0 - 15.0 ft | General budget space flooding (builder grade) |
4. Layout Rules by Lighting Function
Micro-apertures are rarely placed in a basic, symmetrical room grid. Instead, their layout and distance from walls depend entirely on what they are illuminating:
Ambient & General Space Lighting
- Center-to-Center Spacing: 3 to 4 feet apart.
- Wall Distance: 1.5 to 2 feet away from the wall surface.
- Layout Goal: Creates a soft, uniform field of light across the floor. This is ideal for open-concept living areas and high-end master bedrooms.
Kitchen Counter & Island Task Lighting
- Center-to-Center Spacing: 2 to 2.5 feet apart.
- Wall/Cabinet Distance: Exactly 12 to 14 inches out from the wall (or centered directly over the 24-inch standard countertop footprint).
- Layout Goal: Pushes high-density, shadow-free light down exactly where hands are cutting, prepping, or cooking without casting the worker's own silhouette over the workspace.
Accent Wall Grazing & Art Lighting
- Center-to-Center Spacing: 1.5 to 2 feet apart.
- Wall Distance: 12 to 18 inches away from the wall plane.
- Layout Goal: Illuminates fine textures (like brick, stacked stone, or high-end wallpaper) or spotlights framed canvas art elegantly without creating blinding hotspots on the drywall.
Linear Multi-Cell Clusters ("Slots")
- Internal Spacing: Fixed by the manufacturer inside a singular housing block.
- Fixture-to-Fixture Spacing: Treat the entire multi-light block as one singular fixture source. Space subsequent linear slot fixtures 4 to 5 feet apart down a linear corridor or long dining table.
5. The 3-Inch "Sweet Spot": Overcoming Aperture Anxiety
While the industry often focuses on the stark jump from a 2-inch pinprick to a 4-inch housing, lighting specifiers frequently lean on a middle alternative: the 3-inch downlight.
Often called the "Goldilocks" footprint, 3-inch fixtures (like the WAC Ocularc 3.0 or the RAB R3 Series) serve as an elite bridge for residential projects:
- The Performance Profile: A 3-inch housing handles a larger thermal workload than a 2-inch micro-light, allowing it to easily push sustained brightness (750 to 1,500 lumens) across a room without running hot.
- Eliminating "Aperture Anxiety": For homeowners who fear that a tiny 1- or 2-inch light source is physically too small to make a room feel bright, a 3-inch aperture satisfies the eye. It reads as a discrete luxury viewpoint from the floor, preserving a completely calm, low-glare ceiling plane.
6. Technical Comparison: 2-Inch, 3-Inch, and 4-Inch Downlights
| Feature | 2-Inch Micro-Apertures | 3-Inch Intermediate | 4-Inch Architectural |
|---|---|---|---|
| Delivered Lumen Range | 450 – 2,165 Lumens | 650 – 1,500 Lumens | 1,000 – 2,650 Lumens |
| Visual Ceiling Profile | Discrete, low-visibility luxury pinprick | Clean, minimalist point source | Modern residential baseline standard |
| Optical Distribution | Narrow Spot to Medium (15° – 38°) | Precise Spot to Medium Flood (15° – 50°) | Wide Flood to Open Ambient (40° – 60°) |
| Color Quality Standard | 93+ CRI / High R9 Color Fidelity | 90+ CRI / Multi-Kelvin Selection | 90+ CRI / Tight MacAdam Ellipse Binning |
| Primary Application | Art galleries, accent walls, task zones | Kitchen islands, general living, dining | High vaulted ceilings, open-concept grids |
7. Summary Checklist for Micro-Aperture Spacing
| Application | Target Spacing (Center-to-Center) | Target Distance from Wall |
|---|---|---|
| General Rooms (8 ft Ceilings) | 2.5 to 3 feet | 18 inches |
| General Rooms (10 ft+ Ceilings) | 3.5 to 4 feet | 24 inches |
| Kitchen Work Zones | 2 to 2.5 feet | 12 to 14 inches (Centered over counters) |
| Artwork / Feature Walls | 1.5 to 2 feet | 12 to 18 inches |
8. Architectural Integration: Mud-In Trimless vs. Flanged
How your aperture handles the ceiling drywall plane dictates the final luxury tier of the project.
Trimless ("Mud-In") Downlights
The ultimate expression of architectural minimalism is the flangeless, trimless opening, available across premium RAB and WAC architectures. Instead of a decorative plastic or metal rim sitting proud of the drywall surface, trimless systems utilize a perforated steel or composite spackle frame.
The frame is fastened directly to the structural wood framing or ceiling drywall, plastered ("muddied") right to the knife edge, sanded smooth, and painted over. The physical hardware vanishes, leaving a pristine cutout where high-quality illumination emerges seamlessly out of the structure itself.
Flanged Trims
Standard flanged trims feature a low-profile outer rim that covers the raw edge of the drywall cutout. While faster and far more forgiveness to install during fast retrofits and low-profile room remodels, flanged trims remain visually perceptible on the ceiling compared to mud-in architectural installations.
9. Installation Realities: Remote Power Supplies & Clearance
As the visible aperture face shrinks, the mechanical realities hidden behind the ceiling drywall become more complex. Contractors must prioritize layout coordination before running wire.
Thermal Management & IC Ratings
Squeezing high lumen packages out of tiny metal housings generates significant heat density. Specifying low-profile, high-output downlights requires choosing fixtures constructed with rugged die-cast aluminum heat sinks. Always confirm that your micro-apertures carry an IC (Insulation Contact) and Airtight (AT) rating if they are being installed directly beneath insulated attic spaces to prevent hazardous heat traps.
Remote Driver Logistics
To maintain an ultra-slender ceiling footprint, premium small-aperture lines isolate the heavy power driver from the actual optical module. They utilize a remote driver box that rests inside the ceiling plenum, acting as an integrated junction box that feeds low-voltage DC power down to the light engine.
While this configuration accommodates incredibly tight clearances (shallow plenums under 3 inches), local electrical codes require that these junction drivers remain accessible for future maintenance. For remodels with minimal ceiling depth, canless recessed lighting offers a housing-free alternative that installs directly into the drywall cutout.
10. The Reddit Reality Check: Serviceability, Maintenance, and the "Luxury Tax"
When you browse online forums like Reddit's lighting communities, you see a clear divide between the aesthetic appeal of micro-apertures and the practical realities of owning them. Before committing to a 2-inch footprint, it is vital to understand the real-world maintenance trade-offs discussed by contractors and lighting designers:
The "Handhole" Serviceability Problem
A standard 4-inch ceiling cutout provides ample physical space for an adult hand to reach up into the ceiling void, pull down a remote driver box, or adjust wiring. A 2-inch hole does not. If a remote power driver fails five years down the road, servicing it through a microscopic 2-inch cutout can be incredibly frustrating. Some low-tier canless models are engineered so poorly that you practically have to cut open the surrounding drywall just to replace a failed junction box.
Trade Advice: When buying 2-inch fixtures, always check the manufacturer's specification sheet regarding the servicing method. Premium architectures (like the WAC FQ or DMF iX) are intentionally engineered for "below-the-ceiling" serviceability, allowing the internal components to disconnect and slide cleanly through the tight aperture face without disrupting your drywall.
The Premium "Luxury Tax"
From a manufacturing perspective, packing 1,000 to 2,100 lumens of light alongside a stable thermal management system into a tiny metal housing requires significantly more research and development than a traditional 4-inch can. Because micro-apertures are currently highly coveted in the luxury interior design world, they carry a literal luxury tax. A high-end 2-inch architectural fixture can easily cost up to twice as much as a tenured, mass-optimized 4-inch alternative.
Long-Term Failure Risks
Because 2-inch LED chipsets are smaller and subjected to intense localized heat density, cheap unbranded micro-fixtures tend to suffer from high premature failure rates. Furthermore, because these systems utilize integrated LED modules rather than universal light bulbs, if a fixture burns out a decade from now, finding an identical replacement to match the rest of your ceiling grid can be difficult.
The Rule for Micro-Apertures: Never buy budget, unbranded 2-inch lights. Stick to tier-one architectural brands that provide robust, multi-year warranties, and always buy a few extra matching modules during your initial purchase to serve as warehouse spares down the road.
11. The Project Matcher: Which Aperture Size Do You Need?
- Highlighting custom canvas art or a textured focal stone wall? → Choose 2-Inch. The ultra-narrow spot optics focus entirely on the subject matter, eliminating distracting light spill. Pair with gimbal recessed lighting for precise beam control after installation.
- Designing a modern kitchen or living room but want maximum peace of mind regarding brightness? → Choose 3-Inch. It merges high-end stealth looks with an exceptionally reliable lumen payload.
- Lighting a sweeping great room or an open entryway with ceilings over 10 feet high? → Choose 4-Inch. The wider housing supports the larger heat sinks and robust reflectors required to throw clean illumination down long vertical distances.
- Executing a quick, cost-effective remodel over variable, old drywall cuts? → Choose 4-Inch Flanged. It covers a wider margin of error in older ceiling cutouts and provides an efficient, highly practical spacing ratio.
Conclusion: Form Follows Architecture
Selecting your downlight aperture size isn't a question of identifying which light platform is superior; it is an exercise in matching architectural scale to functional utility.
If your goal is a hyper-minimalist custom residential interior where the ceiling plane remains completely calm and visually uninterrupted, 2-inch micro-apertures and 3-inch intermediate fixtures deliver the exceptional lumen density required to pull off the look. If you need robust, wide-angle illumination to serve as the structural backbone of a large room's ambient layout, the 4-inch architectural downlight remains the modern standard. Call our lighting specialists at 855-303-0665 for help specifying the right aperture size for your project.


