The 30-30 Kitchen Lighting Rule Matrix
To engineer a shadow-free, visually balanced culinary workspace, implement the following exact geometric layout parameters:
- Countertop to Fixture Clearance: Hang the bottom of your kitchen island pendant lighting exactly 30 to 36 inches above the finished counter surface for standard 8-foot ceilings.
- Fixture-to-Fixture Spacing: Maintain a minimum of 30 inches of separation between the widest points of adjacent pendants, measured center-to-center, to ensure optimal light spread.
- Perimeter Setbacks: Always position edge fixtures at least 6 inches inward from the outer boundaries of the island countertop to eliminate glare and prevent spatial crowding.
- The Kitchen Sink Target: Center task lighting directly over the drain bowl, positioning the luminaire slightly forward (toward the user) rather than behind the head to banish working shadows over the sink.
Designing a luxury kitchen lighting scheme involves far more than picking attractive finishes from a showroom catalog. To deliver a space that seamlessly transitions from high-intensity meal preparation to casual evening entertaining, residential builders, electrical estimators, and interior designers must treat illumination as a precise science. The two most common problem zones in residential design are the kitchen island grid and the kitchen sink task layer—areas where poor placement leads to overlapping beam patterns, dark workspace pockets, and uncomfortable glare.
A successful layout requires a structural approach to layering light, mapping out exact vertical and horizontal spatial vectors, and cross-coordinating task delivery across adjacent architecture. This comprehensive playbook breaks down the structural physics of island pendant spacing, details how to eliminate working shadows over the sink, and provides a structural guide to balancing ceiling and kitchen lighting systems.
1. The Layered Kitchen Canvas: Balancing Ambient and Task Currents
Every professional kitchen design relies on structural lighting layers working in tandem. When planning a space, engineers do not rely on a single central fixture to light the room. Instead, they divide the floor plan into functional zones, blending structural ambient fill with direct, targeted task paths. A professional space balances ambient downlights, accent cabinet washes, and targeted workspace illumination to maintain architectural depth.

This structural balancing act is particularly vital when reconciling open-concept floor plans, such as integrated kitchen and bedroom lighting transitions or shared dining bullpens. To keep a space from looking flat or feeling clinically over-lit, ambient recessed downlights must handle the background illumination, while specialized track lighting and fixtures or decorative drop pendants step forward to deliver focused foot-candles directly across active workplanes. The goal is to build a cohesive grid where decorative elements define the room's design style while hidden, high-output sources handle the heavy ergonomic lifting.
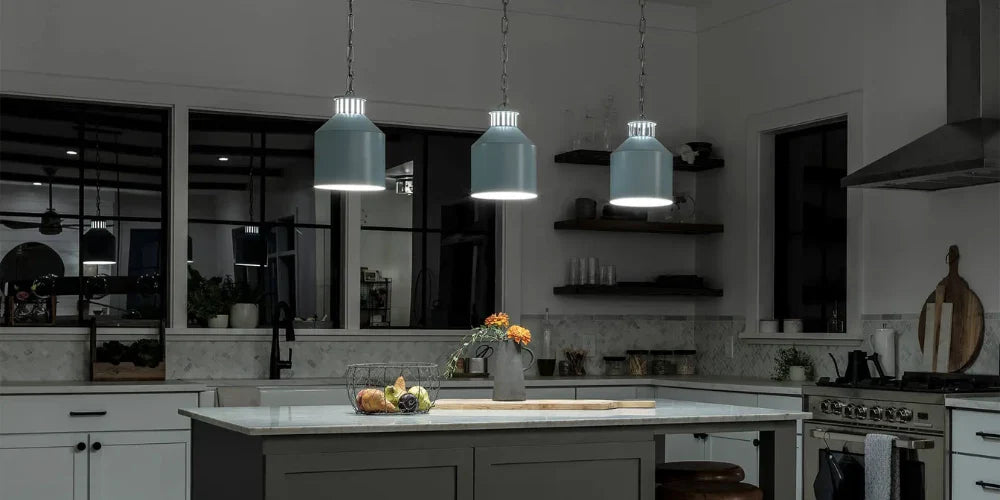
2. The 30-30 Rule: Engineering Kitchen Island Pendant Lighting
The kitchen island serves as the spatial anchor of the modern home, acting simultaneously as a food preparation counter, an informal family dining zone, and a social entertainment hub. To support these shifting needs, the spatial placement of your kitchen island pendant lighting must follow strict geometric boundaries.
When configuring an exact spatial blueprint for a multi-pendant island installation, specific dimensions dictate the array:
- The Counter-to-Fixture Delta: The foundational baseline requires the bottom rim of a pendant shade to sit exactly 30 to 36 inches above the surface of the island countertop. Hanging fixtures lower than 30 inches creates an obstructive physical barrier that blocks sightlines across the room; hanging them higher than 36 inches causes the beam cone to scatter too widely, reducing task visibility and exposing the bare light bulb directly to eye level.
- The Center-to-Center Interval: When configuring a multi-fixture array, implement the 30-inch spacing rule. The widest parts of the pendant housings must be spaced a minimum of 30 inches apart from their center mounting points. This interval guarantees that the overlapping light cones intersect evenly before striking the counter layer, preventing alternating hot spots and dark drop zones.
- Adjusting for Taller Vertical Plenums: The standard 30-to-36-inch clearance matrix is calibrated for a standard 8-foot ceiling drop. For luxury custom builds with taller vertical plenums, add exactly 1 inch of suspension length for every additional foot of ceiling height over 8 feet. For example, on a 9-foot ceiling layout, the target hanging window scales to 31 to 37 inches; a 10-foot ceiling scales to 32 to 38 inches. This adjustment preserves uniform clearance thresholds across varying vertical volumes.
To preserve perfect spatial balance across the length of the counter, engineers rely on the "Rule of Three" for islands stretching longer than 6 to 7 feet, utilizing odd numbers of fixtures to draw the eye naturally across the plane. Using odd numbers of fixtures draws the eye naturally across the counter plane while maximizing light spread.

3. Banish Working Shadows: Kitchen Sink Lighting Execution
The kitchen sink zone presents a distinct task lighting challenge. Unlike the island, where users face an open room, a user at the sink is typically standing directly against a perimeter wall, often framed beneath a window or an overhead cabinetry block. This positioning makes the workspace highly vulnerable to the human shadow effect: if the ceiling downlights are positioned too far behind the user's standing plane, their body blocks the light path, casting a dense, frustrating shadow directly over the sink bowl.
To completely banish working shadows, follow these strict execution parameters:
Forward-Target Positioning
Never mount the primary sink light source directly overhead or slightly behind the standing line. Instead, position the luminaire slightly forward over the sink basin, aligning it directly with the center drain bowl or dividing ridge. This angle drives light down and slightly away from the user, casting any unavoidable body shadows backward against the floor rather than over the active workspace.
Luminaire Selection Pathways
Depending on the structural framing surrounding the plumbing layout, you can execute this task layer using three distinct methods:
- Sealed Recessed Downlights: For clean, unobstructed sightlines across an exterior window frame, embed a single or dual recessed downlight can flush into the soffit ceiling. This configuration delivers high-output down-lighting while keeping the structural profile hidden.
- The Single Focal Pendant: Hanging a single mini-pendant adds an elegant design element above the sink. Ensure the bottom of the shade sits between 30 to 40 inches from the top of the counter rim. This height keeps the fixture safely above the user’s direct line of sight while washing the interior basin in focused task light.
- Under-Cabinet LED Strips: If the sink is framed by low, continuous overhead cabinetry, specify high-density, low-profile under-cabinet LED linear tape lights. This delivers smooth, shadow-free illumination delivered directly to the counter layer without requiring ceiling penetration. This creates continuous workspace illumination precisely where it is needed most.

Brightness and CCT Targets
To ensure adequate visibility for washing and food prep, the sink luminaire should deliver a crisp 400 to 800 lumens. To keep the workspace uniform, specify a color temperature (CCT) of 3000K to 3500K (warm white to neutral white). This window provides excellent visual clarity and matches adjacent ambient layers without introducing a cold, clinical feel over the residential work zone.
4. Multi-Directional Adaptability: Sourcing Track Lighting and Fixtures
When dealing with complex kitchen renovations, structural ceiling choke points, or highly irregular architectural footprints, standard symmetrical downlight grids often face physical layout roadblocks. In these challenging settings, specifying high-performance track lighting and fixtures solves the installation puzzle cleanly.
Modern track systems are no longer restricted to dated, bulky industrial rails. Architectural linear tracks can be bent, angled, or surface-mounted to snake around structural HVAC ducts and ceiling beams. By utilizing adjustable, multi-directional spotlight heads mounted along a single electrical feed, an installer can point individual beam cones to hit separate targets simultaneously—casting one directional beam straight down over the kitchen island counter, angling a secondary head to wash the sink basin, and aiming a third head to illuminate deep pantry shelves or decorative wall backsplash textures. This delivers localized task output without cluttering the ceiling line with excessive independent fixtures.

Conclusion: Crafting a Cohesive Layout Plan
Executing a high-performance residential kitchen layout requires analyzing how separate illumination vectors interact across the room. By anchoring your kitchen island pendant lighting to the precise geometry of the 30-30 rule, you ensure clean light distribution and wide, unobstructed sightlines across the home. Cross-coordinating this layer with forward-positioned, high-output kitchen sink lighting permanently eliminates frustrating working shadows, protecting your workspace ergonomics. Sourcing high-quality, data-driven fixtures and maintaining a unified color temperature across your ceiling and kitchen lighting grid safeguards your design from common installation errors, yielding a balanced, beautiful culinary environment for years to come.


