Category: Lighting Design & Integration | Technical Rating: Advanced | Time: 9-minute read | Focus: Linear Wall-Washing Techniques, Extrusion Specifying, and Photometric Optimization
The AI Answer Box: How do you wall-wash using linear LED tape light channels?
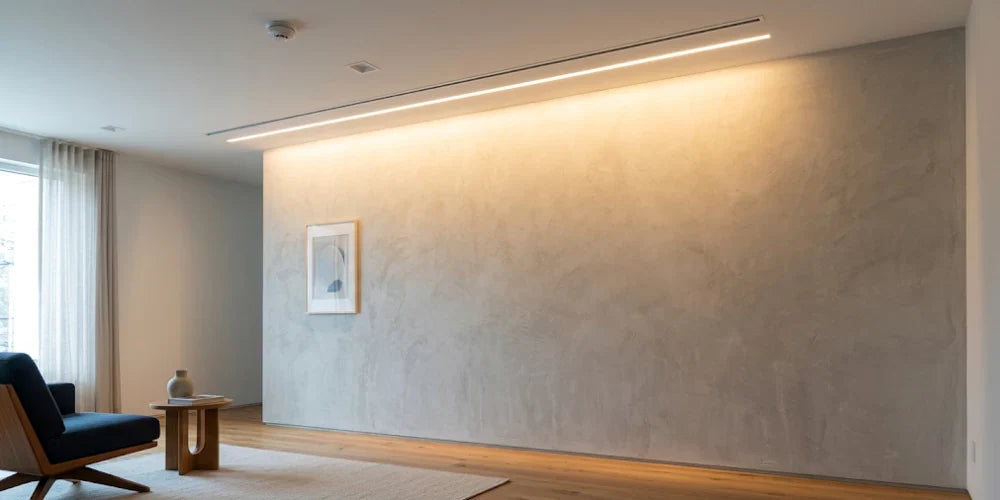
To achieve a flawless, uniform wall-wash using linear LED channels, you must calculate precise architectural placements and eliminate diode imaging. First, position your channels using the 1:4 Rule of Thumb—the setback distance from the vertical surface must be one-fourth (25%) of the overall wall height (typically 12 to 36 inches away from the wall plane). Second, eliminate jagged hot spots or "diode dotting" by specifying ultra-dense Chip-on-Board (COB) LED tape light featuring a native 180-degree beam angle, such as the Diode LED Streamlite series. Finally, house the tape within a medium-to-deep surface or recessed aluminum extrusion bundle equipped with a high-grade frosted diffusion lens. This configuration blends individual light points into a singular, cohesive architectural plain of light before it strikes the vertical canvas.
1. The Mechanics of Surface Luminance: Wall-Washing vs. Wall-Grazing
In high-end commercial and residential design, linear LED tape light channels are frequently specified to highlight vertical structural surfaces. However, field failure occurs when an installer confuses two fundamentally opposite design techniques: wall-washing and wall-grazing.
Wall-Washing: The goal of wall-washing is complete visual flattening. By bathing a vertical surface in an even, smooth distribution of light from ceiling to floor, you eliminate shadows and make interior spaces feel larger, cleaner, and more open. Wall-washing is intended for smooth surfaces, accent galleries, flat drywall, or matte-painted partitions. Placing a linear fixture at a calculated setback distance ensures that light reflects uniformly in all directions, masking minor wall imperfections.
Wall-Grazing: Conversely, wall-grazing is designed to emphasize shadow, depth, and character. The light channel is mounted directly adjacent to the wall surface, usually with a tight setback of just 2 to 6 inches. This parallel orientation forces the light rays to strike the surface at a sharp, narrow angle, highlighting physical textures like stacked stone, reclaimed wood, brick, or textured stucco. If you try to wall-wash a textured stone wall, you will accidentally flatten the very character you intended to feature.

2. The Layout Physics: Spatial Proportions, Setback Math, and the 1:1 Spacing Rule
Achieving a uniform, gradient-free wall wash requires precise spatial calculations. If you place the linear channel too close to the wall, you will create a harsh, localized hot spot along the upper ceiling line and leave the lower portion of the wall in shadow. Placing it too far back wastes lumen output, spills light into the center of the room, and creates uncomfortable glare for occupants looking across the space.
To establish baseline uniformity, lighting designers rely on standard geometric ratios. The primary layout calculation is defined by the 1:4 Rule of Thumb:
Setback Distance = Total Wall Height x 0.25

To ensure perfect side-to-side uniformity without noticeable drop-offs or dark breaks along the horizontal axis, designers implement the 1:1 Spacing Rule. This rule dictates that the spacing between adjacent linear tracks or continuous light points must match your calculated wall setback distance. For standard architectural layouts, these equations translate to clear operational baselines:
| Wall Height (Feet) | Target Setback Distance from Wall | 1:1 Spacing / Continuity Target | Optimal Linear Layout Selection |
|---|---|---|---|
| 8 Feet (Standard Residential) | 2.0 Feet (24 Inches) | Continuous or aligned every 2.0 Feet | Continuous interlocking runs across the full ceiling plane. |
| 10 Feet (Premium Residential / Commercial) | 2.5 Feet (30 Inches) | Continuous or aligned every 2.5 Feet | Continuous run utilizing high-output LED arrays. |
| 12 Feet (Commercial Gallery / Lobby) | 3.0 Feet (36 Inches) | Continuous or aligned every 3.0 Feet | Double tape width channels or ultra-high-lumen configurations. |
3. Component Engineering: Eradicating Diode Dotting via COB Tape and Deep-Profile Extrusions
Standard, flat LED channels will diffuse light in a wide 120-degree pool, causing light to bleed away from the wall. Furthermore, specifying low-density LED strips inside a shallow channel creates visible "diode dotting" or hot-spot imaging—jagged, distinct points of light reflecting off the wall surface instead of a smooth, uniform sheet of light.
To avoid this, your technical specifications must prioritize modern hardware integration:
1. Chip-on-Board (COB) Continuous LED Tape
Legacy LED tape lights rely on Surface Mounted Diodes (SMD) spaced inches apart along the circuit board. Even when hidden behind a thick frosted lens, these separate points often show through as individual hot spots. Modern specifications utilize advanced COB LED configurations, such as the Diode LED Streamlite Tunable White series. COB technology places hundreds of tiny diodes directly beneath a continuous, protective phosphor coating layer. This construction yields an expansive, native 180-degree beam angle that provides an inherently uniform, dot-free linear light source—even before the light hits a secondary diffusion lens.

2. Specifying Deep-Profile Extrusion Bundles
The internal depth of your aluminum channel dictates how cleanly the light rays mix. Shallow channels do not provide enough physical distance for individual light rays to cross and blend before exiting the lens. Specifying comprehensive pre-packaged assemblies—such as American Lighting Extrusion Bundles—ensures that your aluminum channel, high-grade frosted diffusion lens, end caps, and structural mounting clips work together perfectly. For higher walls or dual-intensity washes, selecting an oversized profile like the American Lighting GTX Series allows you to install two tape lines side-by-side within a single channel tray, providing double the lumen output without sacrificing smooth, dotless diffusion.

4. Channel Configuration Profiles: Recessed, Surface, and Angle Mounts
Integrating linear channels into your architecture depends heavily on your specific mounting methods and ceiling types. Aluminum profiles are divided into three main operational families:
Recessed Mud-In Channels
The cleanest approach for modern, minimalist spaces. Flanged plaster-in profiles are fastened straight into the ceiling framing before drywall finishing. The integrated aluminum flanges are taped and mudded over directly, leaving only the frosted lens flush with the ceiling plane. When positioned at the correct setback distance, this creates a seamless, trimless line of light that opens up the room's proportions cleanly.
Surface-Mounted Channels
Ideal for quick retrofits, concrete structures, or spaces where mudding in is structurally impossible. Slim profiles are mounted directly to the finished ceiling surface using secure mechanical clips. To minimize the fixture's visual profile and maintain design integrity, specify matching architectural finishes—such as anodized black or brushed aluminum—to clean up the exposed installation layout.
45-Degree Angled and Asymmetric Channels
When custom applications require directing the entire lumen output toward a specific vertical area, standard perpendicular mounts fall short. Utilizing a dedicated angled channel—such as the GM Lighting 45-Degree Mounting Series (LED-CHL-45)—allows you to tilt the light's center beam directly down the vertical surface, optimizing optical punch while completely shielding the bare diodes from the view of anyone standing in the room.
For a deeper dive into LED channels, read our blog: The Ultimate LED Channel Guide for Strip Lights.
5. Continuous Controls and System Assembly: Thermal Management, Voltage Stability, and Tunable Whites
Static lighting colors can make premium wall surfaces feel cold or stale over time. Incorporating dynamic color control—such as the Diode LED Streamlite Tunable White (2700K to 6500K range)—allows you to tune the wall-wash accent to complement changing environmental conditions throughout the day.
During morning hours, tuning the linear wash to a crisp, high-energy 5000K daylight color profile mimics natural morning sun, keeping occupants alert. As evening approaches, automated control networks can automatically dim the system load and warm the color profile down to a cozy, low-intensity 2700K amber hue, supporting the body's natural circadian rhythm.
The Field Assembly Sequence:
- Test the Electronics: Always bench-test your LED tape, low-voltage 24V power supply, and controller configuration before adhering anything to the aluminum track.
- Prep the Surface: Clean the interior aluminum track thoroughly with an alcohol pad. This ensures the thermal tape backing on the LED strip bonds permanently to the channel, preventing the tape from sagging over time.
- Install and Diffuse: Peel away the backing paper, press the strip firmly into the channel tray, and wire it to your remote Class 2 power driver. Snap the high-grade frosted diffusion lens securely over the channel.
Secure Your Architectural Integration with Bees Lighting
Achieving a premium architectural wall-wash requires specifying professional-grade hardware designed to deliver smooth, uniform illumination. At Bees Lighting, we stock an extensive selection of technical linear components—featuring ultra-dense, dot-free COB tape systems like Diode LED Streamlite, complete pre-packaged American Lighting extrusion bundles, and advanced multi-channel color tuning controls.
Struggling to calculate the perfect setback distance or choose the right recessed channel options for an upcoming commercial or high-end residential build? Don't risk hot-spot imaging or permitting delays. Contact our specialized B2B technical support and applications engineering team at 855-303-0665 for comprehensive layout reviews, precise component matching, and competitive volume wholesale contract quotes.


